Assessment day.
[not a disclaimer]Without using it as any kind of excuse at all for the assessment on the day I was not in the right frame of mind at all. Unfortunately not something I could control, I was simply having a down day due to medical reasons, this aside I should still have been able to perform better than I did.
I was organised for the assessment, I had all the tools I needed to complete the look I was creating except the rats. I had previously used the rats supplied by the uni which were stuffed with tissue and I think due to miscommunication, neither of us had prepared any rats to use for the assessment. So before it was time, we both went out and bought a pair of tights and cotton wool.
Unfortunately because we didn't do a test run with the new rats we had made we didn't realise that cotton wool was a bad choice to stuff them with, it made them too firm inside and when it came to it the pins didn't go through. This was what ultimately nearly destroyed the entire finished product.
I can honestly only blame myself for now being totally prepared and I can hold my hands up.
Beginning the assessment I followed the instructions to a T even though we had practiced it numerous times, so I started with constructing the halo plait around the perimeter and that was all fine and neatly sectioned and I was happy with that so moving on to step two, I sectioned off the top and removed the piece I was curling for later, backcombed as usual and then the rat disaster struck.
The struggle I had was rolling the hair around the rats we had made, I don’t know whether these were bigger than the ones we had used before but I didn’t seem to be able to wrap the hair around them as I did in the practice sessions, and the rat was visible at either end.
I then got frustrated and tried this again and again which wasn’t a good idea because the more I did it the worse it got,
Even after following the instructions, which I didn’t need anyway after having practiced it enough already, I couldn’t get the shape right and it was uneven and just not working for me as it had done previously, then when it came to pinning the hair on the top the small pins wouldn’t go through and into the rat and this just caused chaos for me, the more I tried to force the pins in the more I was pulling out the shape I created.
I did manage to grip it into place but I wasn't happy with the shape after struggling with the pins. After three tries it would have to do, time was running out.
So I curled my left out section, tried to use that to disguise the parts of the rat that were on display and it sort of managed to look alright, then again when it came to pinning the curls round the top more struggle with the pins, so they have to go in a bit looser and more horizontally compromising the strength of the overall outcome.
All in all this was an utter shambles and I was not happy with myself at all. I went in after G'ing myself up with a good frame of mind and half way through I felt utterly defeated.
I knew that I knew what I was doing, I knew every step of the design to a T and It just didn’t happen for me on the day,
I definitely didn’t need more practice for the look, But I should have prepared and tested the rats before the assessment. I do simply think it was the rats we used because they didn’t work with the pins and I couldn’t get a firm shape in the hair which mean't, and being a perfectionist, I was not happy.
I know I can work under pressure and this is something I was used to but when the rats weren’t co-operating I totally lost focus and didn’t know how to overcome the problem instead I got more and more angry at myself even though I had Lauren supporting me and telling me it was okay and to relax.
So as well as all that I felt bad because I shouldn’t have put this stress onto my client when they are in the chair, I could tell she was feeling my stress and this isn’t something I do to a client. I can usually stay very calm, collected and professional and on this occasion I just did not manage to compose myself and in the professional world I don't think it's acceptable.
I have really angered myself because I know this is something I can do, I can accept that some things simply don’t work or sometimes they just don’t go the way that they are planned but in this instance because I am a hairdresser, its my background and I do have a lot of skill in the area I was more annoyed that I didn’t get the outcome I wanted. I don't know if it was down to self- confidence as well because that's also something that can push me back a lot of the time.
All in all, the finished result did resemble what I had done before but I felt that I did it better in the practice sessions but it all turned out okay in the end, and the final photos I'm happy with, looking back on the session now, although I feel I could have performed better, I can still say I'm proud of my work and the skills I've used.
Blame it on the rat.
December 01, 2015

November 18, 2015
Final assessment plan - Partner
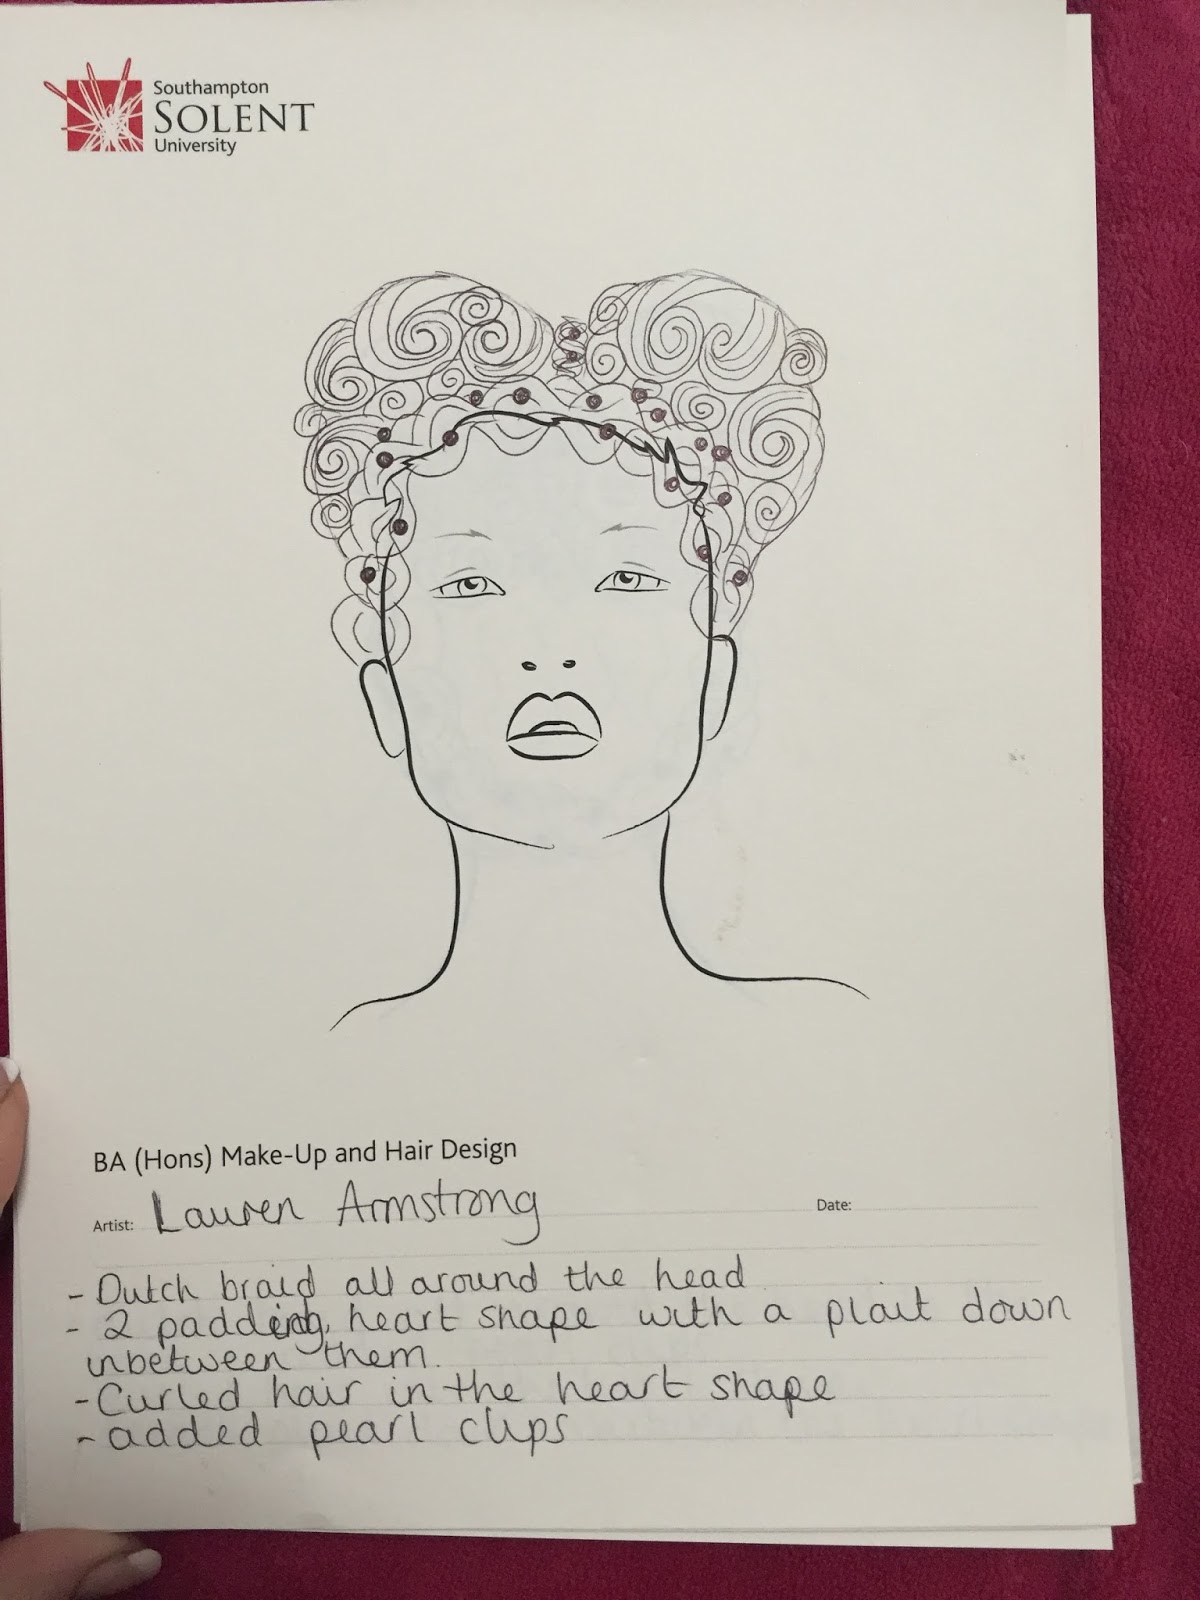
Lauren's Design
Intructions.
1 Begin by sectioning off two inches from around the hairline all the way around the head,
starting at the ear on one side, french plait the hair down to the nape and around to the other ear, the braid should be thicker here and across the front, plait looser to create a thicker effect, once at he starting position, plait the remaining hair and pin underneath the initial plait at the back of the head.
2 Take the top halo section of remaining hair and seperate into two even sections, leave one inch from the perimeter of both sides, then take the hair, backcomb at the roots for structure and then roll the rat from tips to roots and secure just underneath the parting, repeat on the other side, criss-crossing the pins to secure the rat and hair into place.
3 With the one inch sections, curl the ends using a large tong and leave to cool, then take the section and smooth over the top of the now padded hair, gripping it at the midlengths around the underside of the rat toward the parting where the rat is gripped into place. This hair provides a smooth section to place over the top and because of the length and leaves around 4 inches of curls.
Make sure to leave a section at the back for plaiting.
4. Place the curls at random, spreading them around over the padded hair. Use the small section at te back to plait and sit over the parting area to cover any visible grips, bring this to the front of the padding and bring it back in a 'u' shape to create a teardrop at the front above the halo plait.
5 Spray the hair to hold and add the pins with pearls attached around the halo plait and between the halo plait and padding at random, add them down the center of the hair as well to accentuate the parting between the padding.
Tools-
Pin tail comb
Backbrushing brush
Rats
Pins/grips
Tongs/curlers
Hairspray
Decorative pins.


Practice 2 - Partners design
I began again with the halo plait around the head and this time I made it fatter than previously by pulling some of the sections out a little bit which seperated it slightly. We both liked how this looked because it added a slightly modern twist into it which was the boho messy braiding look that's been popular recently.
The next task was to get two even structures on top of the hair, as we said before we were going to heighten the design by adding rats.
I began by initially putting all the hair into the rats and rolling them up but because we didn’t add any texture through crimping it looked a little bit boring and still needed the curls on top.
I then let the hair down again and curled it all, to then roll back up and planned to use the ends to place over the structure.
I tried to roll the hair into the rat, somehow, without the ends being inside because I wanted to use the curls on the ends and this just didn’t work.
Change of plan, I left out just one inch section from the outside, rolled the rest into the rat and secured by criss-crossing the pins into one another.
The hair left out was just the right length as well that I could take it over the padded hair and pin just on the underside, leaving around 4 inches in length of curled hair that I could then place over the top.
After thinking it through properly this was a better way to do it and make sure I had a secure shape on top. Although I had less curls to work with on top, this didn’t matter because the overall outcome was a lot neater.
I struggled at first with the volume of hair and managing to get it all neatly into the rat, as it wasn’t crimped as well it had to be really neat and smooth so this was a challenge for me as well as working out the simplest way to really secure all the hair and make sure it wasn’t going to move.
Practicing with longer hair and a rat is something that I need to do more as working on the Katie head there is a lot less hair to wrap.
From this I also realised I really needed to practice my French plaiting to make sure it was neat, in terms of sectioning and even throughout.
From this we can create a plan of action to follow for the assessment, which I will be able to use methodically to create the final design.
The overall look I was extremely happy with and it all worked out well considering there were some factors to chop and change.
I feel now I have a good idea of what to use and the steps I need to take to create the look.I think the design change was a good idea to save time on curling due to the amount of hair and I'm feeling confident for the final assessment.


The next task was to get two even structures on top of the hair, as we said before we were going to heighten the design by adding rats.
I began by initially putting all the hair into the rats and rolling them up but because we didn’t add any texture through crimping it looked a little bit boring and still needed the curls on top.
I then let the hair down again and curled it all, to then roll back up and planned to use the ends to place over the structure.
I tried to roll the hair into the rat, somehow, without the ends being inside because I wanted to use the curls on the ends and this just didn’t work.
Change of plan, I left out just one inch section from the outside, rolled the rest into the rat and secured by criss-crossing the pins into one another.
The hair left out was just the right length as well that I could take it over the padded hair and pin just on the underside, leaving around 4 inches in length of curled hair that I could then place over the top.
After thinking it through properly this was a better way to do it and make sure I had a secure shape on top. Although I had less curls to work with on top, this didn’t matter because the overall outcome was a lot neater.
I struggled at first with the volume of hair and managing to get it all neatly into the rat, as it wasn’t crimped as well it had to be really neat and smooth so this was a challenge for me as well as working out the simplest way to really secure all the hair and make sure it wasn’t going to move.
Practicing with longer hair and a rat is something that I need to do more as working on the Katie head there is a lot less hair to wrap.
From this I also realised I really needed to practice my French plaiting to make sure it was neat, in terms of sectioning and even throughout.
From this we can create a plan of action to follow for the assessment, which I will be able to use methodically to create the final design.
The overall look I was extremely happy with and it all worked out well considering there were some factors to chop and change.
I feel now I have a good idea of what to use and the steps I need to take to create the look.


November 16, 2015
Final Assessment Plan - Mine
Ross' Design
Tools -
Crimpers
Tongs
Hairspray
Tail comb
Clips
Grips/Pins
Aqua Palette
Instructions.
1 Begin by crimping the hair all over in small sections. Hairspraying the section beforehand.
2 Isolate 4 small sections on the crown and plait for later.
3 Use the large tongs and beginning at the front of the head from the parting to ears on both sides. Create 3 sausages each side and grip into place, this is the starting point for the rest of the hairstyle to follow.
4 Create sausages around the head and grip into place following your bottom two rolls, work from the front around the sides until you reach the other roll at the opposite side, blend the sections together to create a continuous roll. Repeat this for the second one that wraps round the head.
5. The top two should just go backward until you reach the crown.
6 Take the plaits created on top and cross them over each other and secure to create a 'crown' like structure and spray to finish, add gold Aqua colour to the plaits to add to the 'crown' effect.

Tools -
Crimpers
Tongs
Hairspray
Tail comb
Clips
Grips/Pins
Aqua Palette
Instructions.
1 Begin by crimping the hair all over in small sections. Hairspraying the section beforehand.
2 Isolate 4 small sections on the crown and plait for later.
3 Use the large tongs and beginning at the front of the head from the parting to ears on both sides. Create 3 sausages each side and grip into place, this is the starting point for the rest of the hairstyle to follow.
4 Create sausages around the head and grip into place following your bottom two rolls, work from the front around the sides until you reach the other roll at the opposite side, blend the sections together to create a continuous roll. Repeat this for the second one that wraps round the head.
5. The top two should just go backward until you reach the crown.
6 Take the plaits created on top and cross them over each other and secure to create a 'crown' like structure and spray to finish, add gold Aqua colour to the plaits to add to the 'crown' effect.

November 12, 2015
Practice 2 - My design
Second practice session.
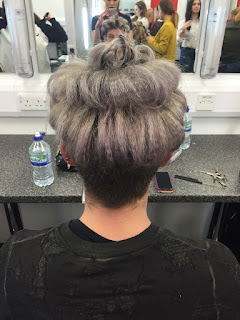
I reviewed the last time we did my design on my hair and discussed how we could improve it. I changed my design so that it removes some of the hair into plaits which would then be used to create a ‘crown’ shape at the top and also reduced the amount of hair that needed crimping and rolling making the time of the look quicker and the stress on my partner a little bit less.
We began this time by isolating the crown area and creating four small plaits then we proceeded as before to crimp the hair, this time we added a little bit of hairspray before crimping to ensure a nice neat finish and also reducing the amount of fluffiness as the hair stuck together more and retained the texture better.
When we went onto creating the barrel rolls instead of free handing it we tried using the large tong to create the sausage shape for us and this was definitely a better idea, the hair after being on the tong was then the exact shape we wanted it to be and again, from the heat and a little more hairspray the shape held and less hair was able to be missed.
This was also better for my design because the tong ensures all the rolls would be the same diameter and this helped with the symmetry of the final hairstyle.
With minimal effort the rolls could be put into placed and pinned with a lot more ease.
Another struggle that came to light was that my hair is so short on the sides that the outer grips did not have anything to grip to, as we had another two weeks until the final assessment I decided that I would leave the sides to grow out a bit and then this would make sure, even if just slightly, that there was more hair to secure to.
The plaits on the crown were then pinned into place and we managed to criss-cross them over themselves to create the ‘crown’ on top of the head and I think this small addition to the style changed it completely and added something interesting.
We didn’t do it on this occasion but for the final assessment we will use Aqua colour in gold to paint the hair.


I reviewed the last time we did my design on my hair and discussed how we could improve it. I changed my design so that it removes some of the hair into plaits which would then be used to create a ‘crown’ shape at the top and also reduced the amount of hair that needed crimping and rolling making the time of the look quicker and the stress on my partner a little bit less.
We began this time by isolating the crown area and creating four small plaits then we proceeded as before to crimp the hair, this time we added a little bit of hairspray before crimping to ensure a nice neat finish and also reducing the amount of fluffiness as the hair stuck together more and retained the texture better.
When we went onto creating the barrel rolls instead of free handing it we tried using the large tong to create the sausage shape for us and this was definitely a better idea, the hair after being on the tong was then the exact shape we wanted it to be and again, from the heat and a little more hairspray the shape held and less hair was able to be missed.
This was also better for my design because the tong ensures all the rolls would be the same diameter and this helped with the symmetry of the final hairstyle.
With minimal effort the rolls could be put into placed and pinned with a lot more ease.
Another struggle that came to light was that my hair is so short on the sides that the outer grips did not have anything to grip to, as we had another two weeks until the final assessment I decided that I would leave the sides to grow out a bit and then this would make sure, even if just slightly, that there was more hair to secure to.
The plaits on the crown were then pinned into place and we managed to criss-cross them over themselves to create the ‘crown’ on top of the head and I think this small addition to the style changed it completely and added something interesting.
We didn’t do it on this occasion but for the final assessment we will use Aqua colour in gold to paint the hair.


Changes to my design

Changes to my final design.
I decided that after the first practice session the hair needed something adding into it, I kept the overall design but decided to add in a 'crown' on the crown area made out of plaits.
This is way of adding in decoration but it's simply made out of the hair.
The plan then is to paint it gold with Aqua colour
November 10, 2015
Photoshoot hair - crimped updo
I recently did a photoshoot with another course member and for this I was involved in the hair for the shoot.
The first brief from the photoshoot was a simple sleek curled up do which i found quite easy to do, the model had naturally curly hair so I used some simple techniques of backcombing around the perimeter for height and pinned it all sparodically into the middle creating as I went along. for these kinds of hair ups i find going with the flow and easier way to do it, I had a reference picture to follow but I had the general idea anyway and I always like to put my own take on things.

The second brief and second look we were given was a 'Tim Burton' style look, so to change the hair we used crimping all over to get a good frizz to the hair and the colour was perfect for the look as well and we both said, although this wan't for out project, this would have been perfect for the Elizabethans.
There wasn't really a plan for this second look again so I took it upon myself and with some help, backcombed the hair all over to create good height and texture to the look and then we went asymmetric with it, I literally got one side of the hair, lifted the top up and pinned the bottom half under, on the other side the hair was left very big but allowed to drop and go more natural.


I really enjoyed my time on this shoot, it was however really stressful because there wasn't a definite plan to what we were doing, this is down to us as makeup and hair artists to ask for details but also down to the organiser of the photoshoot who should have given us more specific details.
The organiser of the shoot had a very vague idea of what she wanted and I think as someone in control of the end result regarding the hair and makeup I made some good decisions and interpreted it well enough.
The end result was good and the looks we created were 'perfect' according to the photographer so although I think organisation wasn't good at all in this case it did actually all turn out the way we wanted.
I enjoyed being able to use the new skills and techniques in a different environment as well outside of the lesson time and on something completely off track from the project.
The first brief from the photoshoot was a simple sleek curled up do which i found quite easy to do, the model had naturally curly hair so I used some simple techniques of backcombing around the perimeter for height and pinned it all sparodically into the middle creating as I went along. for these kinds of hair ups i find going with the flow and easier way to do it, I had a reference picture to follow but I had the general idea anyway and I always like to put my own take on things.

The second brief and second look we were given was a 'Tim Burton' style look, so to change the hair we used crimping all over to get a good frizz to the hair and the colour was perfect for the look as well and we both said, although this wan't for out project, this would have been perfect for the Elizabethans.
There wasn't really a plan for this second look again so I took it upon myself and with some help, backcombed the hair all over to create good height and texture to the look and then we went asymmetric with it, I literally got one side of the hair, lifted the top up and pinned the bottom half under, on the other side the hair was left very big but allowed to drop and go more natural.


I really enjoyed my time on this shoot, it was however really stressful because there wasn't a definite plan to what we were doing, this is down to us as makeup and hair artists to ask for details but also down to the organiser of the photoshoot who should have given us more specific details.
The organiser of the shoot had a very vague idea of what she wanted and I think as someone in control of the end result regarding the hair and makeup I made some good decisions and interpreted it well enough.
The end result was good and the looks we created were 'perfect' according to the photographer so although I think organisation wasn't good at all in this case it did actually all turn out the way we wanted.
I enjoyed being able to use the new skills and techniques in a different environment as well outside of the lesson time and on something completely off track from the project.
Subscribe to:
Posts (Atom)